In our last post, we discussed eSIM-compatible tablets and laptops and the benefits they provide. In this post, we’re going to get a tad more technical and show you how to set up your eSIM data plan on a tablet or laptop. So, if you have an eSIM-enabled tablet or laptop – or are about to buy one and want to get an idea of what comes next – read on!
How Do I Know If My Tablet or Laptop Is eSIM-Compatible?
eSIM technology is only a few years old and it’s going to take a little while until it’s the industry standard. As a result, only select, newer tablets and laptops support eSIMs. So, before you download an eSIM plan, you’ll need to know if your device is compatible.
Fortunately, we’ve compiled a list of eSIM-compatible devices – so, if you’re unsure, check if yours is on the list before reading the rest of this post.
It’s fine, we’ll wait for you….
How to Set Up An eSIM On A Tablet
First, let’s look at how to download a new eSIM plan on Apple and Microsoft tablets. Make sure you’re connected to a wifi network and follow the instructions below.
How to Set Up An eSIM On An iPad With A QR Code
The great news is, as you might imagine, setting up an eSIM data plan on a tablet isn’t so different from a phone. First and foremost, in most cases, you need to double-check that your iPad is unlocked before downloading your eSIM plan. Once you know that’s sorted, here’s how to set up your plan with a QR code:
- After purchasing your eSIM plan, the network provider should have sent you a QR code and activation code via email. Pull up the QR code on a screen, like your phone or laptop, and scan it with your iPad.
- You’ll see a screen asking you to confirm that you want to add a data plan: click continue.
- On the following screen, click on the button that reads “Add Data Plan” at the bottom of the screen.
- If needed, enter the activation code sent by your network provider to complete your eSIM activation.
How to Manually Set Up An eSIM On An iPad
Alternatively, you may have to activate your new eSIM plan manually; here’s how to get that done:
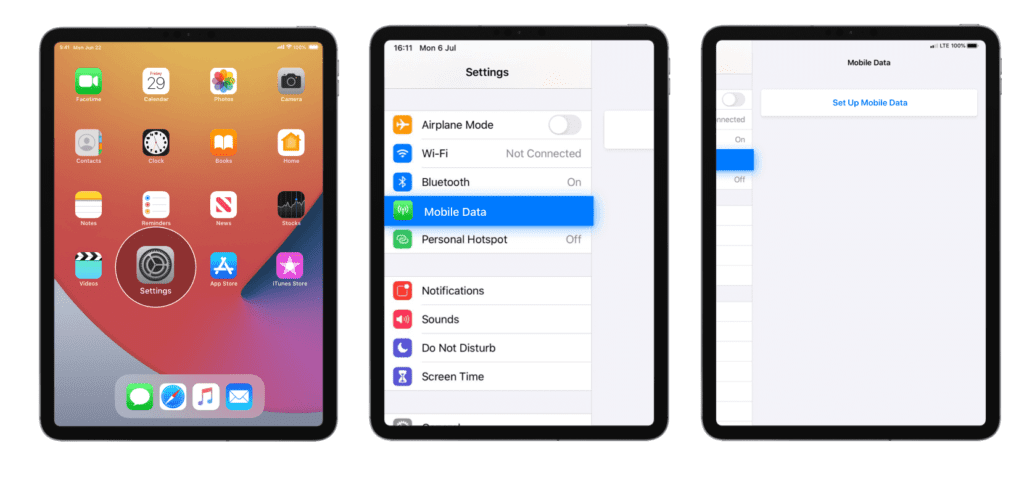
- Open “Settings”
- Choose “Mobile Data”
- Choose “Add Data Plan”
- This will bring up a screen that reads “Add Data Plan”; click on “Enter Details Manually” at the bottom of the screen.
- Enter the activation code sent by your network provider and click “Install Data Plan” to complete your eSIM activation.

How to Set Up An eSIM on Microsoft Tablets
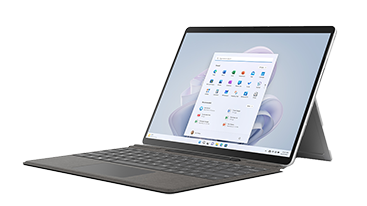
You can set up your eSIM plan on a Microsoft Surface Pro tablet as follows:
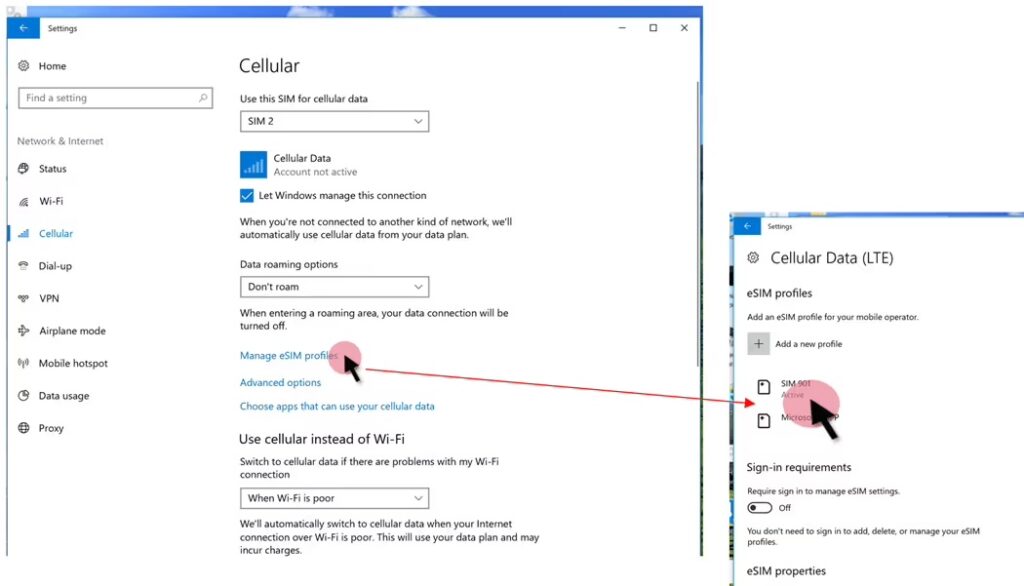
- Click the Start button (Windows icon) and go to Settings > Network & Internet
- Go to Mobile > Manage eSIM Profiles, and then click “Add a new profile”
- Select “Let me enter an activation code I have from my mobile operator”, and hit Next to continue
- Pull up the QR code sent by your network provider on another screen and scan it.
- The activation code will appear in the box on-screen: click Next and follow the prompts
- A dialogue box asking “Do you want to download this profile?” will appear on-screen. Type the confirmation code sent by your network provider into the box and then click Download. Then press Close
- Go back to Settings > Network & Internet > Mobile > Manage eSIM profiles
- Select the eSIM profile you just set up and click Use.
- A message will pop up that reads, “This will use mobile data from your data plan and may incur charges. Do you want to continue?”. Hit “Yes”, and you’re good to go!

How Do eSIM Laptops Work?
An eSIM works in your laptop similar to a conventional plastic SIM card: by allowing your laptop to connect to the Internet through a mobile, or cellular, connection. Where plastic SIMs must be inserted into your laptop in order to connect (as they store the information regarding your network provider and data plan) an eSIM is already embedded into your laptop at the factory. Therefore, to connect to the Internet on an eSIM–enabled laptop, you just need to activate your data plan on the eSIM with just a few clicks. This provides many advantages over standard alternatives such as plastic SIM cards, wifi dongles, and tethering.
The first notable benefit of an eSIM is that you can download multiple data plans and switch between them at will. This is especially handy if you want separate data plans for work and home or for different destinations as you travel. A second significant benefit is that an eSIM makes the process of installing a data plan 100% digital. You don’t have to go into a store or wait for a SIM in the post: you can simply purchase your eSIM plan online and activate it within minutes.
How to Set Up An eSIM on a Laptop
Now, we come to how to activate your eSIM plan on a laptop. For your laptop to support eSIM, it must be running Windows 10 Version 1703 and later or Windows 11. If you have Windows 10, do the following to check the version:
- Hit Start, then go to Settings > System > About
- Scroll down to Windows specifications
- Note the number displayed next to Version
Once you’ve established that you have a version of Windows that supports eSIMs, here’s how to activate your plan:
- Click the Start button (Windows icon) and go to Settings > Network & Internet
- Go to Mobile (or Cellular) > Manage eSIM Profiles, and then click “Add a new profile”
- Select “Let me enter an activation code I have from my mobile operator”, and hit Next to continue
- Pull up the QR code sent by your network provider on another screen and scan it.
- The activation code will appear in the box on-screen: click Next and follow the prompts
- A dialogue box asking “Do you want to download this profile?” will appear on-screen. Type the confirmation code sent by your network provider into the box and then click Download. Then press Close
- Go back to Settings > Network & Internet > Mobile/Cellular > Manage eSIM profiles
- Select the eSIM profile you just set up and click Use.
- A message will pop up that reads, “This will use mobile data from your data plan and may incur charges. Do you want to continue?”. Hit “Yes”, and you’re all set!

I Need An eSIM Plan! What Do I Do Next?
Next, take a look at our superb selection of eSIM plans from over 200 network providers across 180 countries and territories.
So, if you’re taking a trip to Thailand, are on business in Bali, or need a more permanent eSIM subscription plan, take full advantage of your eSIM-compatible tablet or laptop and download your plan today!


